First Impressions of Asahi Linux
I bought my M1 Mac over a year ago with the intention of installing Asahi Linux on it, but I never got around to it until now. I am still thrilled to be using an ARM workstation made by a major computer manufacturer, and it’s good to be able to run the operating system of my choice on it (though macOS is acceptable for entertainment and video calls, Linux is what I work and do my organization in). And I don’t particularly do GPU-intensive things in my day to day computing – I run XMonad, of all things! – so I don’t really feel like I’m missing out by not having a “proper” graphics driver.
Installation#
The Asahi Linux installation process, in spite of some dire warnings, was relatively friendly. It was a “wizard” process rather than a series of instructions to run individual commands that I would have to read off a website. Wizard is definitely better, because those instruction series almost always contain mistakes, assumptions of things you’d “obviously” do, or un-fleshed-out untested alternatives; NixOS in particular has stolen from me many hours of frustration I’ll never get back (and hours later of fixing configuration issues that resulted just from me following instructions from official materials).
So, I guess simply because I’m comparing it to NixOS, Asahi Linux felt extremely easy to install! I didn’t even mind that there wasn’t a concrete recommendation for how much space to give each operating system (although I would have appreciated it). The installer did, however, do two things that annoyed me.
The first thing was that it asked me if I wanted to enter some sort of
an expert mode. It said that the questions it would ask in that mode were
only interesting to developers, and while normally that would be “yes,
absolutely me,” in this case I think they meant “developers of Asahi
Linux” – so, not me. I wanted to say y out of curiosity, but I didn’t
want to actually choose any wrong option and risk bricking my laptop –
which I don’t think were the actual stakes, but I wasn’t entirely sure.
I really hope that if I’d said y, it would have been okay. I would
hope that the default option in each “advanced” prompt would be the same
as what I’d get if I didn’t do advanced options, but I didn’t really
trust them to do that, and it was intimidating.
I’d much rather they said what the advanced options actually did, and reassured me that you could always go with the pre-set defaults if you were unsure, rather than just ask me if I wanted to do “expert mode.”
So that was a little annoying.
The second thing that annoyed me was something that the designers have definitely put some thought into, and I’m befuddled how they arrived where they did.
So, there is one point where the computer is turned off, and you must follow the instructions on how to turn the computer back on very carefully and particularly, or else there be dragons, because if you don’t boot it into recovery mode for the first boot, then Linux will never install.
That isn’t the problem. I appreciate them communicating the stakes, and communicating how it works. I’m sure it’s not their fault that you have to do this extra step, but rather something to do with how the M1’s firmware work. However, I am befuddled why they provide the instructions in the most detail on the laptop where you’re currently installing it – you know, a screen that’s immediately going to disappear as soon as you turn the computer off. There were 7 steps!
It appears that I was expected to:
- Read all 7 steps very carefully
- Memorize them (carefully!) and remember them when I turned the computer back on
Now, I have ADHD, so my short-term prospective memory is very poor. There’s also a high chance that I’ll get distracted while the computer’s off, and will have to come back to the turning-it-on step later. But even a neurotypical person can’t be expected to reliably remember how to do 7 steps carefully.
I took a picture of the instructions with my phone. I think they should have:
- Suggested writing down or taking a picture of the instructions, because “careful” is likely not good enough for many people.
- Included all 7 instructions in detail on the website, so if you fail to write it down, you get more than this condensced summary:
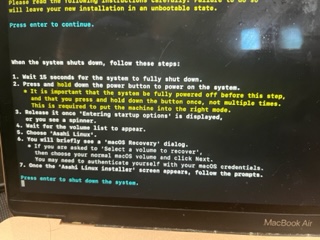
Once the first stage of the installation is done, you will have to reboot into 1TR mode (One True recoveryOS) in order to finish the install. Read the instructions that the installer prints carefully! Simply rebooting into the new OS won’t work until this is done. You need to fully shut down your machine, then boot by holding down the power button until you see “Entering startup options”, choose your new OS in the boot selector menu, and follow the prompts.
The website references the transient “instructions that the installer prints.” If anything, the installer should direct you to the website, which should give the instructions in equal detail to how the installer gives them:
In any case, what I actually did was panic, close the laptop, panic again, open it again, realize that made it turn on, and held down the power button – which worked, in spite of blatantly violating the instructions. So maybe warn people not to close and then re-open the laptop, while you’re at it?
… Perhaps it’s moves like this that prevented me from installing NixOS correctly, where they just kind of assume you wouldn’t do something that dumb.
First Boot#
I haven’t dual booted a computer since I lived with my parents, and either had to share a computer with them (my Linux partition and their Windows) or later when I only had one computer that I could use in full privacy, but needed both Linux and a more “normal” OS – thus an iBook which ran Mac OS and a PowerPC version of Ubuntu. Even when I ran FreeBSD and other out-there OSes, I had a dedicated (old) full-tower desktop to run it from.
So the idea of dual-booting a “normal” OS that comes with the computer and the more “edgy” programmer-friendly OS that is Linux is quite nostalgic for me. I wondered whether there was any way to refer to macOS with capitalism-criticizing character substitutions a la Mi¢ro$oft: maybe macO$? And to be honest, I was even a little nervous that my IT/sysadmin skills had rotted a little bit since I was a kid. Even though this installer was bending over backwards to make everything easy, this was an alpha operating system unsupported by the workstation vendor.
But all went well.
Once you have it installed, the computer boots into Asahi Linux. You have to hold down the power button to get the boot menu – it uses a firmware-based boot manager to distinguish macOS and Linux. This is a little annoying, as I prefer being asked what operating system I want to boot every time in a dual boot set up, but I can deal with it.
The first boot requires a few remaining set up steps to select keyboard
layout, language, and time zone, and also to name the computer and set up
a default user. I named the computer protectorate as part of my
forms-of-government naming scheme (my Dell laptop is palatinate),
and in reference to that this is Linux acting in somewhat foreign territory,
claimed by another Unix.
Once this set-up had been complete, I turned on Wi-Fi, which to my mild surprise worked immediately and like a charm, from the KDE-based graphical WiFi menu.
I mean, in all honesty, I kind of knew it would work the first time – that was the point – but I was still viscerally surprised. I guess I am used to the idea of getting Linux to run on a “new” or “odd” platform being an issue of chasing down driver after driver, so I’m happy that I have a distribution designed for basically exactly the computer that I have, even if it’s not a computer particularly associated with Linux.
Then, as soon as I’d verified that Linux worked, I very nervously rebooted the whole thing into macOS – which also worked. Yay!
Next Steps#
So that’s where I am now.
To get my normal Linux workflow set up, I’m going to need XMonad and Dropbox. This should be interesting, as I understand neither of those things are Arch Linux packages on ARM, and Dropbox isn’t supported on Linux ARM at all (though you can maybe use their APIs directly to implement a janky home version?)
So, when I get that all set up, I will let you know in another post!
Pictures will come with the next blog post.
I make no promises as to schedule.
Subscribe
Find out via e-mail when I make new posts! You can also use RSS (RSS for technical posts only) to subscribe!
Comments
If you want to send me something privately and anonymously, you can use my admonymous to admonish (or praise) me anonymously.
comments powered by Disqus